

Epson XP-640 is a multi-function compact printer from the printer manufacturer, Epson. The printer works with ink-jet color technology. You can copy, print, and scan documents all at once. It uses both black and white prints and color prints. The printer comes with the Epson DuraBrite Ultra Inks. The printer has four in-built ink cartridges. It can print up to 9 pages per minute in black and white ink, and 4.5 pages per minute for multi-color prints. The printer uses the Epson Micro Piezo inkjet technology. The maximum printing resolution for the printer is 5760*1440 dpi. It also supports red-eye correction and photo restoration technology
Table of Contents
ToggleEpson XP-640 Setup – hardware Setup
- Unbox the Epson XP-640 Printer –
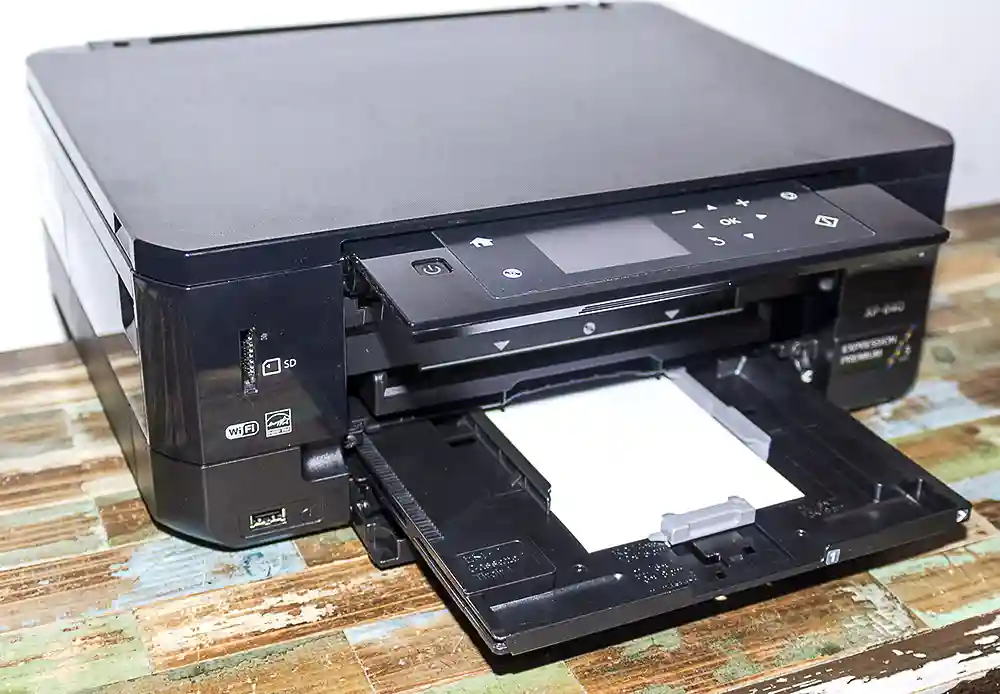
Start off the Epson XP-640 Setup process by first unboxing the printer. Remove all the plastic packaging off the printer and place it close to your computer or laptop.
Take out the power cable, which was supplied along with the printer, and plug one end into the printer and the end into a power outlet.
Make sure that your printer is not placed in direct sunlight, this might damage the printer over time.
- Turn On The Printer –
Once you have placed the printer in its spot and plugged in the power cable press and hold the power button on the printer for few seconds. Once you see the power LED light, release the button. The display on the printer will show you the Setup instructions.
- Fixing The Ink Cartridges –
Open the printer cartridge access door and remove the cartridges. Hold the cartridges in your hand and shake them gently, this will evenly spread the ink all over the cartridges. If you skip this step, your print quality might not be up to the mark. The pages might come out soggy.
Place the cartridges back in the printer.
- Load In The Papers –
Since the ink charging takes up to seven minutes, leave the printer as such for the time being and pull out the paper cassette. Slide out the paper guides as far as you can. Put the papers in the tray. Ensure that you do not stuff the tray with excessive number of papers.
Configure the settings using the printer display.
- Connect The Printer To The Computer Or Laptop –
Use the USB cable to connect the Epson XP-640 printer to the computer.
Related: Epson XP440 Setup
Epson XP-640 Wi-fi Network Setup –
You can set up the Epson XP-640 printer to communicate with your computer or laptop via a wireless network.
Follow these steps to complete the Epson XP-640 Wireless Setup process –
- Press the ‘Home’ button on the printer.
- Use the arrow buttons to scroll up and down on the display. Scroll down and select the ‘Wi-fi Setup’ option and press ‘Ok’ thereafter.
- Select the ‘Wi-fi Setup Wizard’ and press ‘Ok’. The other options on this screen are – Push button setup, PIN code setup, Wi-fi auto connect and disable wi-fi.
- On the next screen you will see all the networks that are available around the printer.
Select the name of your wireless network from the options. You can also manually type in the name of your network. In order to type in manually, go to the ‘Other networks’ option and click ‘Ok’. The ‘Enter network name’ box will appear on your display. - Next, you have to enter the password of the wireless network. The display is designed to use all sorts of writing styles. To use the uppercase or the lowercase letters, you can click the highlighted letters on the pad.
After you are done typing in the password, select ‘Done’ and move to the next page.
- Press ‘Ok’ on the display asking if you want to confirm the Wi-fi settings.
Related: Epson artisan 1430 wireless setup
Using The Wi-fi Protected Setup Mode
If your router has a WPS push button on it, you can use the Wi-fi Protected Setup method to complete the Epson XP-640 Setup process.
The router might also have virtual wi-fi protected setup feature. You can find it in the software for the device.
- Press the ‘Home’ button on the printer.
- Use the arrow buttons on the printer to scroll through the options on the display.
- Select ‘Settings’ and press ‘Ok’ thereafter.
- Then go to ‘Wi-fi setup’
- The second option under the ‘Wi-fi Setup’ screen is the ‘Push button setup’. Select this option and press ‘Ok’.
- Press the Wi-fi protected setup push button on the router and the WPS option on the printer simultaneously.
- The LCD display will show you what other steps you need to carry out in order to complete the Epson XP-640 Setup.
- Once done, the display will show the Wi-fi symbol.
Both the methods are easy to execute. You also do not have to waste unnecessary time completing the Epson XP-640 Setup process.
More Helpful Guides