
If you get to see that your Epson printer is showing vertical lines or skipping lines, then there must be a reason for having a clogged nozzle. It is one of the most common problems that users face while using their Epson printers. Epson Printer Vertical Lines Problem arises due to unavoidable print head clogs. These print head clogs get scattered due to the deposition of dry ink of a small amount collects in the nozzle. You can prevent the drying of ink by replacing the cartridges promptly when there is a low ink alert. There might appear a different reason that may lead to clogging that we will discuss below.
Causes Of Clogs Leading to Epson Printer Vertical Lines Problem
Commonly, the blocked printhead happens if you use the original Epson or any other aftermarket cartridges. The reason behind the clogging of the printhead is that it gets blocked either by air or the drying of ink. It usually happens due to the following reasons. Let’s discuss it for better learning of the Epson Printer Vertical Lines Problem.
Printing With Depleted Ink Cartridges
If you use empty ink cartridges develop air bubbles which can easily clog the cartridges. Using an empty ink cartridge can cause permanent damage due to overheating of the printhead. Thus, make sure that your ink cartridge is not empty.
Not Turning Off the Printer
However, if you don’t use the ink regularly, it dries up in the nozzles. When you turn on the printer on triggers, it runs a mini-cleaning cycle and makes the ink flow smoothly again. Thus, it is also one of the reasons for Epson Printer Problems with Vertical Lines.
Not Using Printer Regularly
As per the previously mentioned scenario, it is observed that the ink dries if you don’t use your printer regularly and also if you use it twice a month. Therefore, leading to vertical lines problem. If this is the situation then you must go for laser printers. However, laser printers use toner powder and the importance of it is that the toner powder ink doesn’t dry easily.
What Are the Ways to Clean Printhead Of Epson Printer?
It is a must that you check the nozzles of your printer and run the cleaning cycle on it using the menu. It should be done before you open the unit and clean it manually. Let’s dive through the various ways in which you can clean your printhead. You can avoid Epson Printer Vertical Lines Problem with it.
Printhead Cleaning Cycle
There is a pretty cleaning cycle that Epson Printers offer to clean the nozzles of the printhead in one or two cycles. However, one thing to keep in mind is that new models have a long cleaning cycle that unfortunately uses more ink. Here are the steps to get all this started.
- Before heading to do anything on the printer, ensure that the printer doesn’t show any error on the LCD screen.
- Now, click on the home button and then select ‘SetUp’ plus ‘Maintenance’.
- After this, select the printhead nozzle check.
- Your printer will produce a page with four colored grids that are designed to illustrate which nozzle is blocked or which is unblocked.
- If you get to discover that there are no gaps present then you can select done.
- However, if you find that there are a few gaps or faint lines then you can select ‘Clean The Printhead’ and continue.
Caution: Make sure that you don’t switch off your printer during the cleaning cycle process. This practice can permanently damage your printer.
Points To Look for Under Printhead Cleaning Cycle
- If you observe that there is no improvement despite two to three hours of the cleaning cycle then set your printer to rest for a few hours. The recommended time for rest by Epson is 6 hours rest. Go for the cleaning cycle and check whether there is an improvement or not.
- There are a lot of people who will keep running the cleaning cycle for six or eight hours. It may work in cleaning the printhead. Doing such a practice frequently might make the clog worse and it uses a lot of ink.
- Therefore, if you are unable to clean it after undergoing a lot of cleaning cycle procedures under warranty but still cannot observe the improvement. Then you must contact the Epson Support.
- Whereas, if there is no warranty then you can proceed to clean all the integral parts manually to clean all the stubborn ink clogs. There are several ways with which you can go for manual cleaning. Here you will learn about the various manual cleaning procedures.
Cleaning With Sponge Using Distilled Water
- Turn off the printer and open its top. Make sure that you can see the assembly of the printhead.
- Now search for the small plastic lever, it will come up when the printer is not printing anything which is to the left of the assembly. To release the printhead, you have to move it forward and down, consequently pushing the assembly to the right. It might move an inch at first but if you push it to stop it will click. It completely releases the assembly so that it can push to the other side.
- Now print a page with the top-up and then unplug the printer with the assembly at the center plus unlock.
- After this, you must see sponges that store ink from the cartridges in the carriage. You can use an eyedropper or plastic syringe and then saturate the sponge with distilled water or Windex solution.
- Then move back to the assembly over the sponges as right it will go.
- However, allow the distilled water to set for around fifteen minutes. For better results, you must leave the printer to soak overnight.
- Hence, print out eight to ten pages with text and images till the printer prints crisp and clean. However, if you still don’t get a satisfying result, then you must move ahead to clean the printhead.
Using Distilled Water in the Ink Port
- First, remove the ink cartridges from the printer’s carriage.
- After removing the ink cartridges, you get to see small cone-shaped indents that take the ink from the cartridges to the printhead. There is one ink port each for black or color cartridges.
- With the help of an eye dropper or plastic syringe, drop in a couple of droplets of distilled water or printhead cleaner into the plugged ink port. You mustn’t put cleaner into all the ports until and unless you are sure about the color difference in cartridges. To identify the color in all the cartridges, you must check their bottom for color residue. If generically speaking, the yellow color is present at the far right, whereas going on the left it is magenta, cyan, and black.
- Now replace the cartridge and try to wait for the printer to use a new cartridge. If you see any droplets of water dripping from the printhead then you must clean it before moving ahead.
- Therefore, to test the clarity, you need to print out around six to eight pages having text and images. If the result is unsatisfying then you must move ahead with the other option.
Cleaning Printhead with Paper Towels
There are two situations according to which you can clean your printhead.
Option 1: If the printer has a fixed printhead, you must follow the below instructions.
- Turn off your printer.
- Now, take a paper towel and tear it in half, then fold it lengthwise until it is half an inch wide in shape.
- Therefore, open the top of the printer and search for a rubber roller that can transfer paper through the feed system smoothly. The feed is the one where the printhead runs over while printing.
- After this, secure the paper towel with the tape on the roller and put in some drops of distilled water or clean it near the middle of the towel.
- Hence, it’s time to move the printhead assembly on the paper towel and allow it to rest for at least 15 minutes. After that, give time for the dried ink on the printhead to get dissolved. You will observe some black ink on the paper towel after a while, it is just not the black ink but the mixture of all the colorful inks.
- However, repeat the procedure with a new damp paper towel until and unless you get to see various colors from each ink port. To get a good result, you have to repeat the process several times. Despite repeating the process, if you don’t get the result then you must go for the second option.
- It’s time to turn on the printer. Before heading ahead you must make sure that the printhead assembly has returned to the ready position instead of resting in the center position.
- In the end, take printouts of several pages to ensure that the cartridges are all clear.
Option 2: Here you can go for the various video tutorials for a better understanding to clean the printhead of your printer in simple and easy steps. As per the video is concerned you must search out the most relevant video showing the paper towel cleaning method for printhead cleaning.
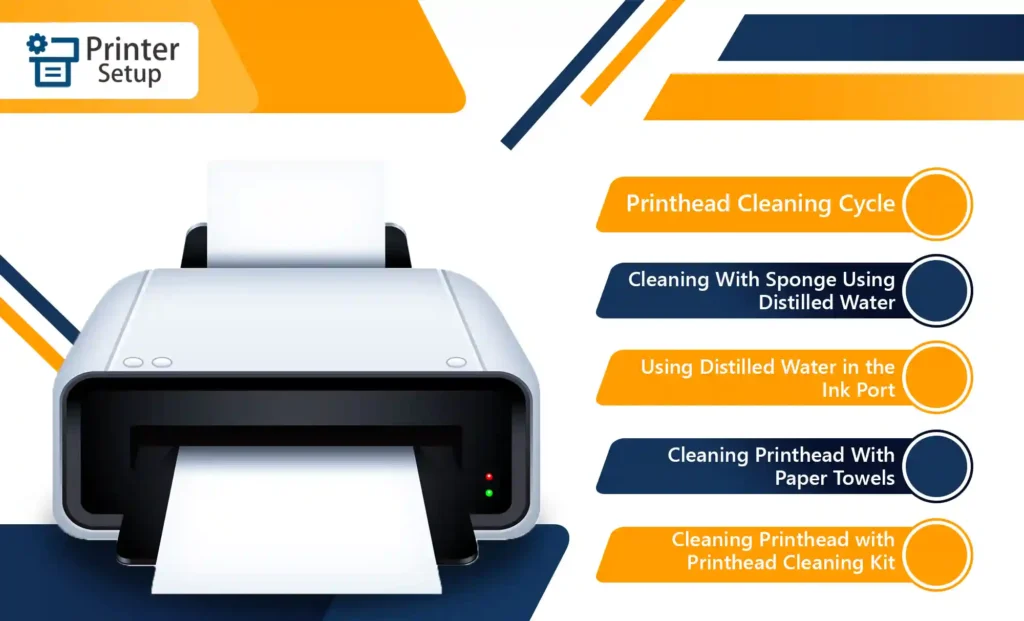
Cleaning Printhead with Printhead Cleaning Kit
If the printhead of your printer is fixed and requires a lot of help to flush the dried ink from the printhead, you need to follow the below simple steps.
- For the process to commence, you will require a printhead cleaning kit. The kit will come with all the suitable materials you will need to clean the printhead.
- Now, switch on the printer and print out a page then print out a page and unplug the printer in the middle immediately. It is to be done so that the printer is in the position of cleaning.
- After this, remove the cartridges and wrap them around the cling wrap so that the ink doesn’t dry. Then set them aside as it was.
- However, take a paper towel and fold it half an inch and then in a lengthwise shape one half an inch wide. Place it under the printhead. Fix the position of the printhead in the middle of the printer.
- Epson wf 3640 color printing problems with vertical lines can be resolved through the above steps. From the printhead cleaning kit take out the syringe and fill it with distilled water or cleaning solution. Now connect the rubber tube to the syringe’s tip.
- Therefore, connecting the other end of the rubber tube to one of the printhead’s ports. Now, if the printer uses four color cartridges, then there will be four ports to connect to and out.
- Hence, slowly pump in the cleaning solution through the ink port until and unless you observe liquid on the paper towel. Make sure you flush out the ink from all cartridge ports.
- Once you are done with the cleaning procedure, reinstall the cartridges and restart the printer.
- In the end, take printouts of several test pages.
Frequently Asked Questions (FAQs)
How to fix the Epson printer vertical lines problem?
There are a few simple steps that will help you in fixing the issue promptly without any errors.
- To check the nozzles, run it to know whether printhead nozzles are facing clogging or not.
- After this, clean the printhead if required.
- It is important to ensure that the type of paper you loaded matches the paper type setting.
- Hence, make sure that you loaded the correct printing side of the paper for your product.
How often should I clean my Epson printer’s printhead?
If the printhead is not regularly cleaned, it will accumulate dirt. Make sure you print from the printer once a month so that the ink in the cartridges doesn’t dry. Despite doing the regular printing, you still need to get it cleaned. So cleaning it regularly will wash off many of the damaging problems.
Can clogging in printheads will damage my Epson printer?
Yes, if the clogging in printheads is ignored for a long time, you will eventually damage the Epson printer. With time the dried ink will cause overheating, if not cleaned in a specific time duration.
Why does my Epson printer print vertical lines?
The printer shows vertical lines when you print through it because the printer has not been cleaned for very long. The ink might be dried in the cartridges or the paper might not be placed properly, blocked, or dirty printheads. You can fix the issue with certain easy steps.
How to fix vertical banding on my printer?
It can be fixed through the following:
- You must align the printheads.
- Then try out an automatic correction for all types of vertical banding.
- However, reducing the vacuum level in steps of 5 mmH2O for Epson printers.
- For better control of the substrate, make use of a take-up reel.
How do I know that my Epson printer ink is clogged?
You can check it through these ways:
- Click on the maintenance button on the printer.
- Now select the nozzle check option, and select the print position for the check pattern. Then confirm it by clicking on the OK button.
- If you get to observe that there are no gaps left, then that shows the printhead is clean.
What is power cleaning in an Epson printer?
With the help of power cleaning you can replace all the inks inside the ink tubes. It helps to improve the printing quality.
How often one should clean Epson printheads?
Make sure that you follow the below table to clean the printheads of Epson printers regularly.
| Area To Clean | Frequency |
| Media edge plates and platen heater | On daily basis |
| Printhead circumference | Once a month when you get a notification on the screen |
| Caps circumference | Once a month |
| Around the flushing pad | Once a month or whenever required |
Check More:

